Understanding the Left Ventricle 3-Chamber View: Comprehensive Cardiac MRI Planning for Technologists
- cardiacmrihub
- Nov 24, 2025
- 4 min read
Updated: Dec 1, 2025
The left ventricle three-chamber (LV 3ch) view is a powerful diagnostic tool that uniquely visualizes the LV outflow tract, both mitral and aortic valves, and the relationship between the left ventricle and ascending aorta. Acquired after standard chamber views, this plane is essential for evaluating valvular disease, outflow obstruction, and basal myocardial segments. This guide provides expert techniques for precise 3ch planning and optimization.
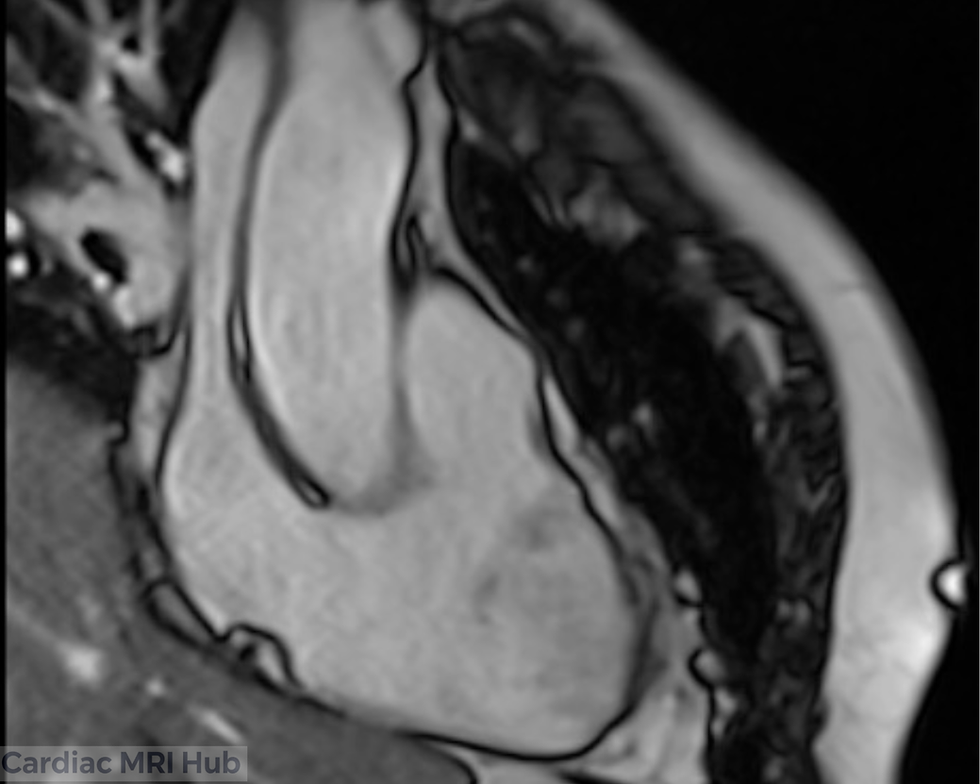
3 Chamber Planning


Pictures to right and left showing orientations on 2ch & 4ch for the left ventricular 3ch.
Overview: The left ventricular three-chamber (LV 3ch) view is an integral component of cardiac MRI, giving direct visualization of the LV, LA, mitral valve, aortic valve, LV outflow tract, and ascending aorta. This view plays a vital role in the evaluation of valvular disease, outflow gradients, and regional myocardial function—bridging anatomic imaging and physiologic assessment.
1. Purpose and Clinical Value
Functional Assessment
Enables specific analysis of LV wall motion abnormalities, especially those involving basal septum and lateral wall.
Directly visualizes LVOT and aortic root for assessment of obstructive lesions.
Valvular Evaluation
Mitral valve and aortic valve morphology, function, and competence can be accurately assessed.
Cine and phase-contrast imaging allow for quantification of regurgitant volumes or gradients across valves.
Outflow Tract Imaging
LVOT assessment is essential in hypertrophic cardiomyopathy, aortic stenosis, and post-interventional follow-up.
Disease Monitoring
Serial evaluation of valve disease, LVOT obstruction, and remodeling post-surgery or therapy (e.g., valve replacement, ablation).
2. Planning and Acquisition Techniques
Orientation and Planning
LV 3ch plane should bisect the center of the LV and LA, passing through both mitral and aortic valves, aligned with the LVOT and aortic root on short axis.
Reference with both 2ch and 4ch planes (planning line should bisect MV and apex of heart) to avoid any foreshortening and guarantee true long-axis view through LVOT.
Patient Positioning & Immobilization
Supine position with arms appropriately positioned to minimize coil artifact.
Ensure breath-hold capability—practice with patients prior to scanning if possible.
Slice Thickness & Resolution
Cine: 6–8 mm slice thickness balances anatomical detail and SNR.
High-resolution (LGE/Valve assessment): <6 mm slices if tissue characterization needed.
Field of View (FOV)
Standard adult FOV: 280–350 mm, adjusted for body habitus.
Always verify the LV, LA, entire LVOT, and aortic root are captured, avoiding excess that dilutes detail.
Timing and Synchronization
Retrospective ECG gating recommended to capture full cardiac cycle (25–30 phases/cycle).
For tissue characterization, target mid-diastole or best phase for reduced motion.
Common Pitfalls
Always double-check the alignment with 4CH and 2CH reference images to avoid oblique/off-axis slices—misalignment can obscure pathology or result in poor reproducibility on follow-up scans.
When evaluating mitral regurgitation with phase-contrast imaging, use the 3CH plane to accurately position flow quantification perpendicular to the regurgitant jet.
For patients with arrhythmia or poor breath-hold capability, be ready to use real-time (non-gated or compressed sensing) cine sequences and adapt your protocol accordingly.
3. Advanced Contrast and Tissue Characterization
Gadolinium-Based Contrast
LGE sequences post-contrast highlight fibrosis, infarction, and valve-associated abnormalities.
Precise timing (7–15 minutes post-injection) and accurate inversion timing are key for differentiating myocardium versus blood pool.
Supplementary Imaging:
T1/T2 mapping and perfusion sequences can further differentiate soft tissue pathology, especially for basal septal involvement or infiltrative disease.
4. Troubleshooting & Optimization Tips
Imaging Artifacts
Motion: Use respiratory gating for challenging breath-holds or free breathing with motion correction algorithms.
Arrhythmias: Adaptive gating/arrhythmia rejection or single-shot sequences may help. Applying compressed sensing if available, may be beneficial.
Coil Placement: Isocenter the coil on heart for highest SNR, utilize multiple coil arrays for improved signal.
Realtime Monitoring
Continuously monitor ECG signal for gating; address poor R-wave detection promptly (skin prep, lead repositioning, or change leads).
Communicate with the patient throughout to ensure comfort and minimal movement.
Protocol Customization
Collaborate with radiologists for case-specific needs, especially complex congenital heart disease.
Adjust slice number, thickness, and imaging sequences based on the clinical indication and patient's tolerance.
5. Post-Processing and Analysis
Volumetric and Functional Analysis
Use advanced cardiac post-processing software for calculation of LV volumes, mass, and ejection fraction.
Assess aortic and mitral valve function, quantify LVOT gradients or regurgitations, and review outflow tract dimensions.
Reporting
Standardized templates improve consistency: include chamber size/function, detailed valve analysis, and any abnormal findings (e.g., obstruction, regurgitation, delayed enhancement).
6. Clinical Scenarios and Pearls
LVOT and Valve Disease
Direct assessment for hypertrophic outflow obstruction and precision evaluation of valvular morphology.
Post-surgical follow-up for valve replacements, repairs, or TAVI procedures.
Left Ventricle and Aorta
Evaluate for basal septal thickening, LV scar, and ascending aortic pathology.
Quantify gradients and assess aortic valve opening as part of integrated cardiac workup.
7. Educational Takeaways & Best Practices
Attention to Planning:
Mastering LV 3ch planning ensures diagnostically powerful and reproducible imaging for diverse cardiac diagnoses.
Protocol Adaptation
Tailor technique for each patient and clinical indication; one size does not fit all.
Team Collaboration
Interact closely with radiologists, referring clinicians to understand clinical questions and optimize scan protocols.
Summary Table: Essential Parameters for LV 3-Chamber Planning
Parameter | Recommendation (Adult) |
Orientation | Bisect MV, LV apex, LVOT, and aortic root |
Slice Thickness | 6–8 mm with or without 2-4mm gap (to make total of 10mm), LGE: Same thickness as cine. |
Field of View | 280–350 mm, adjusted to patient. |
Phase Oversampling | Adjust to patient/FOV to avoid wrap. |
Temporal Resolution | 45ms or less preferred (Real-time 60ms or less) |
Resolution | 1.4-1.8mm preferred. |
Bandwidth | Wide: 750-1300 Hz/Px (Higher reduces artifacts) |
Flip Angle | 40-90 (CINE), 20-25 (LGE) |
Parallel Imaging | GRAPPA 2 or parallel imaging |
Compressed Sensing | Use when available to reduce acquisition time and motion artifacts, especially useful in patients with poor breath-hold or arrhythmia. |
Timing | Retrospective ECG gating; 25–30 phases preferred. |
Contrast | Gadolinium for LGE 10 mins post (delay timing will depend on dose and if stress/rest perfusion performed). Precise timing of TI needed to null myocardium. |
Immobilization | Supine, coil centered over heart. |
Breath-hold | 8-12 sec preferred. |
Conclusion: Mastery of LV 3-chamber view planning adds a critical dimension to cardiac MRI’s diagnostic capability, allowing for comprehensive assessment of LV, LA, mitral and aortic valves, and outflow tract pathology. Elevate patient care with meticulous planning, protocol adaptation, and teamwork for every scan.


Comments